
Insulation Under Underfloor Heating – Polystyrene and System Boards
Underfloor heating is one of the most comfortable ways to heat living spaces – heat spreads evenly across the entire floor area and rises upward into the room, which eliminates cold corners and the unpleasant air movement typical of radiator heating. However, for the system to work efficiently and for heat to actually go where it is needed – to your feet and into the living space – it needs a correctly designed and installed thermal insulation layer underneath the pipes or heating cables.
Insulation under underfloor heating is often underestimated, because once it is covered with screed or flooring it is no longer visible, and the average user does not perceive it directly the way they would a visible manifold or a wall-mounted thermostat. Yet it is precisely this layer that determines how much heat actually reaches the room and how much is needlessly lost downward – into the ceiling of the flat below you, into the ground beneath the house, or into an unheated basement or garage. Insufficient or incorrectly chosen insulation means higher heating running costs, a slower system response to temperature changes, and in extreme cases even complaints from neighbours about their ceiling overheating.
In this article we take a detailed look at the types of insulation used under underfloor heating, the difference between studded system boards and plain polystyrene, how insulation relates to the choice between a wet or dry system, to manifolds, to the way the pipes are laid, and to whether the underfloor heating serves as the main or only a supplementary heat source. At the end you will also find two real-world examples and answers to the most frequently asked questions.
Why insulation under underfloor heating is essential
A thermal insulation layer is always installed underneath underfloor heating pipes. Most often this is a studded system polystyrene board, into which the pipe is clipped directly, or plain polystyrene, onto which the pipe is fastened with clips or mounting rails. The purpose of this layer is clear – to direct heat from the pipe upward into the heated room, while preventing it from escaping downward.
Without quality insulation, a significant part of the heat produced would escape where you do not need it – into the ceiling structure of the flat below you, into the foundation slab, or directly into the ground under the house. This means the boiler or heat pump has to produce more heat to reach the desired room temperature, which translates directly into higher energy costs.
A simple rule applies: thicker and better-quality insulation reduces downward heat loss and at the same time improves the system's response time – that is, how quickly the floor reacts to a change in the thermostat setting. It therefore makes no sense to cut corners on this layer when designing the floor build-up, since once construction is finished it becomes inaccessible and replacing it afterwards is practically impossible without disturbing the entire floor.
Let us also recall the basic principle on which the whole system is based: underfloor heating heats the room over a large area through pipes embedded in the floor (or laid in a dry system under the flooring), through which hot water flows from a boiler or heat pump, or alternatively through electric heating cables or mats. You can read more about the operating principle itself in the article How underfloor heating works. Insulation is part of this principle from the very start – without it, heat would escape evenly in both directions, which would significantly reduce the efficiency of the whole solution.
Studded system boards vs. plain polystyrene
The two most common insulation solutions differ mainly in how the pipe is fixed.
When choosing insulation for underfloor heating, you essentially have two options, which differ mainly in the way the pipe is fixed.
Studded system insulation boards are today the most common and most practical solution. The surface of the board is shaped into a regular grid of studs, between which the pipe is simply clipped in place without the need for any further fixing. This makes installation faster, the pipe stays exactly in place even while the screed is being poured, and the loop spacing is defined from the outset by the board itself, which makes it easier to keep to the designed pipe spacing. An example of such a solution is the STIROTERMAL DUO 20 system insulation board, which is commonly used precisely in wet systems with a concrete screed.
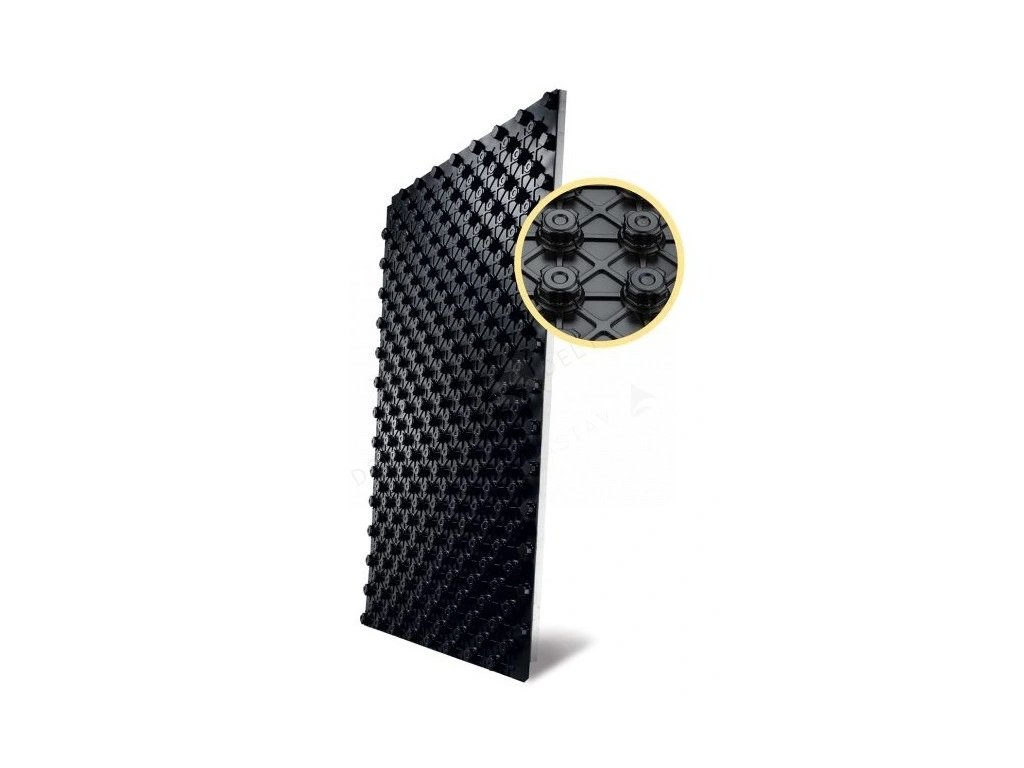
STIROTERMAL DUO 20 system insulation board
Price: €12.26
A studded system polystyrene insulation board for fixing pipes, intended for wet underfloor heating systems.
The second option is plain polystyrene without studs, onto which the pipe is fastened with clips or run through mounting rails. This solution can work out cheaper for the insulation material itself, but installation is more laborious and more prone to inaccuracies in loop spacing, since the pipe is not guided in advance by any grid of studs. In practice, plain polystyrene with clips is used mainly where system boards are unsuitable for various reasons, for example in atypically shaped rooms or when combined with a different floor build-up where the spacing needs to be adjusted individually.
Insulation thickness and its effect on heat loss and response time
The thickness and quality of the thermal insulation layer directly affects two things – the system's overall downward heat loss and how quickly underfloor heating responds to a change in the required temperature.
The thicker and better-quality the insulation laid under the pipe, the less heat escapes in the unwanted direction and the more heat actually ends up where you need it – in the living space above the floor. This shows up as lower energy consumption needed to maintain the same room temperature, since the boiler or heat pump does not have to compensate for unnecessary losses into the substrate.
Equally important is the response time – that is, how quickly a change in the thermostat setting is reflected in the surface temperature of the floor. Good insulation helps focus the heat flow upward and limits its dispersion into the surrounding structures, allowing the system to respond to changes more flexibly. This is exactly why it is worth paying the same attention to choosing insulation as to choosing the boiler, heat pump or manifold itself – it is a part of the system that becomes permanently inaccessible once the screed is poured, and modifying it afterwards is not realistically possible.
This aspect is even more pronounced in rooms above an unheated space – above a garage, a cellar, or directly above ground level – where, without sufficiently thick insulation, the highest downward heat losses of all typical situations in a family house can occur.
Insulation in wet systems and in dry systems
The choice between a wet and a dry underfloor heating system fundamentally affects which type of insulation and which floor build-up is ultimately used.
In a wet system, the pipe is laid directly in a layer of concrete screed – it is, quite literally, embedded in concrete. This method achieves the best heat storage and the most even heat distribution across the floor area, since the screed itself acts as a thermal storage mass. The downside is a greater overall floor build-up height, typically 7 to 10 centimetres of screed above the insulation, and a longer drying time before the system can be commissioned, which is measured in weeks. It is precisely in wet systems that studded system insulation boards, such as the STIROTERMAL DUO 20 mentioned above, are most often used – the pipe stays firmly in place in them even while the screed is being poured and vibrated, so there is no risk of it shifting.
A dry system, by contrast, lays the pipe into system boards or between mounting rails without a wet screed, with a considerably thinner load-distribution layer, for example made of gypsum fibreboard. This variant is especially suitable for renovations where the floor level cannot be raised by many centimetres, or in situations where the heating system needs to be commissioned quickly, without weeks of waiting for the screed to dry. Even in a dry system, the insulation layer under the build-up has its firm place – it directs heat upward and prevents it from escaping, although the overall build-up height and the system's thermal inertia differ from the wet variant.
The choice between the two variants is therefore not just a matter of budget, but above all of the available floor build-up height and the time you have to commission the system. You can find out more about the differences between the two designs in the separate article Wet vs. dry underfloor heating system.
How insulation relates to manifolds and circuit settings
Insulation and the distribution of heat loss are also directly related to how the system is divided into individual circuits and how these circuits are set on the manifold.
The manifold is the central component that distributes water from the boiler to the individual circuits (loops) of the underfloor heating and back – each room or zone usually has its own loop connected to the manifold. The flow rate for each circuit is set on the manifold according to the loop length and the floor area of the room, and actuators controlled by the room thermostats of the individual zones are fitted to it. Manifolds are usually made of brass or stainless steel and are housed in a manifold cabinet, either flush-mounted or surface-mounted.
If the insulation under a particular room is insufficient or of poor quality, that room will have higher downward heat losses, and to reach the same floor surface temperature it will therefore need a different flow setting on its circuit than a room with better insulation. Correctly designed, uniform insulation across the whole floor plan therefore also makes the hydraulic balancing of the system itself easier – individual circuits can be set more predictably when they have comparable heat losses into the substrate.
Stainless steel and brass manifolds perform the same function, differing mainly in price and material.
Both stainless steel and brass manifolds are commonly used for underfloor heating – both types perform the same function, differing mainly in their material design.

Stainless steel 6-way manifold for underfloor heating
Price: €115.72
A stainless steel manifold for 6 separate underfloor heating circuits.

Brass 6-way manifold for underfloor heating
Price: €111.56
A brass manifold for 6 circuits, an alternative to the stainless steel version.
A detailed guide on how a manifold works and how to correctly set the flow of individual circuits can be found in the article Underfloor heating manifolds – how they work and how to set them.
Laying the pipe above the insulation – serpentine vs. spiral
The way the pipe is run above the insulation is called the pipe-laying pattern, and it directly affects how even the floor's surface temperature is.
The serpentine, also called the meander, is the simplest laying pattern – the pipe runs in parallel rows across the entire room. This method is faster to install into system boards, but it creates a slight temperature gradient: near the supply, the floor is somewhat warmer, and toward the end of the loop the temperature drops slightly, since the water has already given off part of its heat to the surroundings.
The spiral, or double meander, runs the supply and return pipe alternately next to each other. This averages out the temperature differences, and the floor surface is more evenly warm across the whole area. The spiral pattern is therefore preferred especially along perimeter walls and in rooms with higher heat losses, where even surface temperature is more important than installation speed.
As with the choice of insulation, the same applies here: studded system boards make it easier to keep precisely to the chosen laying pattern – the studs act as guide points for the pipe and prevent it from shifting during installation. The pipe itself must be specifically intended for underfloor heating, meaning it must have an oxygen barrier that prevents oxygen from diffusing into the heating water, protecting the metal parts of the system – the boiler, manifold, circulation pump – from corrosion.

HEPWORTH pipe for underfloor heating, 16 mm
Price: €1.48/m
A PE-RT pipe with an oxygen barrier, specifically intended for underfloor heating, 16 mm diameter.
You can read more about both laying patterns, their advantages and typical uses in the article Pipe-laying patterns – serpentine vs. spiral.
Insulation with a main or a supplementary heat source
Whether the insulation and the entire underfloor heating system need to cover the room's entire heat loss, or merely supplement another heat source, must be decided already at the design stage – the density of the pipework in the floor cannot be changed afterwards.
The decision between a main and a supplementary heat source must be made already at the design stage.
If underfloor heating is designed as the main heat source, it must cover the room's entire heat loss. This requires a thorough calculation of output and pipe density already at the design stage, since once the screed is poured or the flooring laid, the loop spacing can no longer be changed. In this case, the quality and thickness of the insulation under the pipe also matter more – any downward heat losses must be compensated for by higher output, which for a main heat source means a direct impact on the running costs of the whole heated space.
As a supplementary source, for example only in a bathroom alongside a radiator, underfloor heating mainly provides the comfort of a warm floor underfoot, while the room's main heat loss is covered by another source, most often a radiator. Combining underfloor heating with radiators in a single system is common and works without problems, but it requires correct hydraulic balancing, since underfloor heating operates with lower heating-water temperature than radiators.
Even in a supplementary application, it is not advisable to omit insulation under the pipe – even a small area of warm bathroom floor without insulation needlessly loses heat downward instead of heating the space where you are standing. A more detailed discussion of the differences between the two approaches can be found in the article Underfloor heating as a main or supplementary heat source.
Floor covering and its relation to insulation thermal resistance
The choice of insulation under the pipe is also closely related to which floor covering you ultimately use – both elements together form one thermal chain that runs from the pipe all the way to the surface you stand on.
The most suitable covering for underfloor heating is tile and stone, because they have high thermal conductivity and heat passes quickly through them into the room. Laminate and wooden floors are also possible, but they must be specially certified for underfloor heating – that is, have lower thermal resistance and a declared maximum surface temperature. For such coverings, the manufacturer usually limits the maximum floor surface temperature, typically to 27–29 °C, so the wood does not dry out and warp. Carpet coverings significantly impair heat transfer and are generally not recommended for underfloor heating, or can only be used with low thermal resistance.
If you choose a covering with higher thermal resistance, for example a thicker laminate, the system has to operate at a higher heating-water temperature to reach the required floor surface temperature – and this is exactly when it pays off even more to have good insulation under the pipe, which prevents this higher temperature from being lost downward instead of passing up through the covering into the room. Good insulation therefore partly compensates for the less favourable properties of the chosen covering, although the basic rule – to prefer tiles or a certified wooden or laminate floor – still applies. A detailed overview of suitable coverings can be found in the article Which floor covering is suitable for underfloor heating.
Real-world examples
A family house with a living area above a garage and foundation slab.
Steps for designing the floor build-up when underfloor heating is the main heat source.
Given that part of the floor was located directly above the unheated garage space and above the foundation structure, the choice of good, sufficiently thick insulation was especially important – it is precisely in these places that the largest downward heat losses occur. Studded system polystyrene boards (STIROTERMAL DUO 20) were used as insulation, into which the pipe was clipped directly without any further fixing, which also ensured the pipe stayed in place even while the screed was being poured and vibrated.
Given the larger area of the ground floor, the system was divided into several separate circuits connected to a central manifold, with the spiral laying pattern chosen in living rooms with a larger area of outer walls for a more even surface temperature, while a simpler serpentine pattern was sufficient in smaller inner rooms. Large-format tiles were chosen as the covering throughout, which, thanks to their high thermal conductivity, allowed heat to pass quickly into the space – combined with good insulation under the pipe, the system therefore operates with a lower heating-water temperature than it would if the insulation were undersized or the covering less suitable.
A flat in a panel building – bathroom renovation with supplementary floor heating. A flat in a panel building was undergoing a partial bathroom renovation, where the owner wanted to add a warm floor underfoot to the existing radiator heating. Since it was not possible to significantly raise the floor level in the flat without causing a problem with door height and continuity with the other rooms, a wet system with a thick concrete screed was out of the question.
A dry system was therefore chosen, in which the pipe was laid into system boards with a thinner load-distribution layer made of gypsum fibreboard, without the need for a wet screed and without weeks of waiting for it to dry. Even in this thinner solution, a thermal insulation layer was kept under the pipe, which prevented heat from escaping into the ceiling of the flat below – a particularly sensitive issue in a panel building, since overheating a neighbour's ceiling can lead to complaints.
In this case, underfloor heating was explicitly designed as a supplementary heat source – the bathroom's main heat loss continued to be covered by the original radiator, while the underfloor heating only provided the comfort of a warm tiled floor underfoot. Since underfloor heating operates at a lower heating-water temperature than the radiator, hydraulic balancing of both circuits had to be included when connecting them to the shared system, so that both heat sources would work simultaneously without interfering with each other. Tiles were again chosen as the covering, which are the most suitable for underfloor heating thanks to their high thermal conductivity.
Frequently asked questions
Must there always be insulation under underfloor heating?
Yes. A thermal insulation layer is always installed under the pipes or heating cables, whose purpose is to direct heat upward into the room and prevent it from escaping downward, into a neighbour's ceiling or into the ground.
What is the difference between a system board and plain polystyrene?
A system board has studs on its surface, into which the pipe is clipped directly without further fixing, which speeds up installation and ensures precise loop spacing. Plain polystyrene has no shaped surface, and the pipe is fastened to it with clips or run in mounting rails.
Does insulation thickness affect energy consumption?
Yes. Thicker and better-quality insulation reduces downward heat loss, so more of the heat produced actually warms the room instead of escaping into the substrate – this shows up as lower energy consumption needed to maintain the same temperature.
What type of insulation is used in a wet system and what in a dry system?
In a wet system with a concrete screed, studded system insulation boards are most often used, in which the pipe stays firmly in place even while the screed is being poured. In a dry system, the pipe is laid into system boards or between mounting rails with a thinner load-distribution layer, for example made of gypsum fibreboard, without a wet screed.
Can insulation be replaced or added later after the screed has been poured?
No, practically not. Once the concrete screed is poured or the covering laid, insulation becomes an inaccessible part of the floor build-up, so it is important to pay attention to its choice already at the design stage, not afterwards.
Is insulation also related to the manifold setting?
Indirectly, yes. If a room has higher downward heat losses due to weaker insulation, its circuit on the manifold will need a different flow setting than a room with better insulation. Even insulation across the whole floor plan therefore also makes hydraulic balancing of the whole system easier.
Does insulation also affect how quickly the floor responds to a change in thermostat temperature?
Yes, good insulation improves the system's response time, since it concentrates the heat flow upward instead of letting it disperse into the surrounding structures.
Is insulation needed even when underfloor heating is only a supplementary heat source, for example in a bathroom?
Yes. Even with a smaller heated floor area, it holds true that without insulation part of the heat is needlessly lost downward instead of heating the space where you are standing – so insulation should not be omitted even in supplementary applications.
Related topics
- How underfloor heating works
- Wet vs. dry underfloor heating system
- Which floor covering is suitable for underfloor heating
- Underfloor heating manifolds – how they work and how to set them
- Pipe-laying patterns – serpentine vs. spiral
- Underfloor heating as a main or supplementary heat source
- Underfloor heating installation – step-by-step procedure
- Servicing, bleeding and common faults in underfloor heating
- Frequently asked questions about underfloor heating
Have a question about underfloor heating?
Can't decide, or dealing with a specific situation in your home? Write to us – we're happy to help.