
Underfloor Heating Manifolds – How They Work and How to Set Them
Underfloor heating is nowadays one of the most popular ways of heating family houses and flats, but its actual quality and comfort are not decided only by the choice of boiler or heat pump. A key, yet often underestimated, element of the whole system is the manifold – the device through which all the water flowing to the individual underfloor heating circuits and back passes. Without a correctly sized and correctly set manifold, not even the best boiler and the highest-quality pipe can perform to their full potential: rooms heat unevenly, some circuits are too hot, others stay cold, and the system needlessly wastes energy even though the heat source itself is working correctly.
In this article we take a detailed look at how an underfloor heating manifold works, why each room usually has its own separate circuit, how the flow on the manifold is set, and everything related to its correct placement, operation and maintenance. We also explain the wider context, without which the manifold cannot really be understood – the difference between a wet and a dry system, which floor covering suits underfloor heating, how the pipe is laid within individual circuits, and when underfloor heating can be the main, and when only a supplementary, heat source in a room.
Whether you are planning a new build, dealing with the renovation of a flat or house, or simply want to understand why your underfloor heating does not heat as evenly as it should, this text gives you a practical overview based on real experience and real products commonly used when installing underfloor heating. The article is part of our Knowledge Centre on underfloor heating – if you need to look into a particular aspect of the system in more detail, we recommend also reading the related topics referenced throughout the text.
How underfloor heating works – a quick overview
Underfloor heating heats a room over a large area through pipes embedded in the floor, or laid in a dry system under the flooring, through which hot water flows from a boiler or heat pump – this is referred to as a hydronic (water-based) system. An alternative is electric underfloor heating, where heat is generated directly in heating cables or mats laid in the floor. This article focuses primarily on the hydronic system, since it is the one that uses manifolds, which are its main subject.
The principle is simple yet effective: heat spreads evenly across the entire floor area and naturally rises upward into the room. This creates a pleasant feeling of warmth at foot level, without cold corners and without the sharp temperature differences we know from classic radiator heating, where heat is concentrated over the small area of the heating body, creating more pronounced temperature layers in the room – warmer air near the ceiling, cooler air near the floor. Underfloor heating reverses this effect and spreads heat evenly across the entire floor area, which many users perceive as significantly more comfortable.
Precisely because it is a large-area system distributed over tens of metres of pipe in each room, underfloor heating needs a central control element that distributes water to the right places in the right amounts. This element is the manifold, which we will look at in detail in the following sections of the article.
Wet vs. dry underfloor heating system
A wet system suits new builds better, a dry system suits renovations with limited floor height.
Before we get to manifolds themselves, it is important to understand what type of floor the pipe is actually laid into – this determines how quickly and how evenly the system responds to settings made on the manifold. We distinguish two basic approaches, a wet and a dry system.
The wet system lays the pipe in a layer of concrete screed – it is literally embedded directly in concrete. This method achieves the best heat storage and the most even heat distribution across the whole floor area, because the concrete itself acts as a thermal storage mass. The downside is a greater floor build-up height, typically 7 to 10 centimetres of screed, and a longer drying time before commissioning, measured in weeks. The wet system is therefore most often used in new builds, where this build-up height is already accounted for in the design.
The dry system, by contrast, lays the pipe into system boards or between mounting rails without a wet screed, with a considerably thinner load-distribution layer – for example made of gypsum fibreboard. It is especially suitable for renovations where the floor cannot be raised by many centimetres, or in situations where the system needs to be commissioned quickly, without a long wait for the screed to dry. You can find more on choosing between the two approaches, including practical recommendations by building type, in the separate article Wet vs. dry underfloor heating system.
The choice between a wet and a dry system also directly affects how quickly the system responds to flow changes set on the manifold – thanks to its greater thermal inertia, a wet system responds more slowly to setting changes but retains heat longer even after the source is switched off, while a dry system responds faster but with less inertia.
Insulation under the pipe – why the system cannot do without it
A thermal insulation layer is always installed under underfloor heating pipes. Most often this is a studded system polystyrene board, into which the pipe is clipped directly, or plain polystyrene, onto which the pipe is fastened with clips or mounting rails. The task of this layer is to direct heat in the right direction – upward into the room – while preventing it from escaping downward, that is, into the neighbour's ceiling below the flat or directly into the ground at ground-level floors.
A simple rule applies: thicker and better-quality insulation reduces downward heat loss and at the same time improves the response time of the whole system, since less energy is lost in the unwanted direction and more heat goes where it should – into the heated room. It is therefore worth investing in a good insulation board right from the start when designing underfloor heating, since modifying this layer after the screed has been poured is practically no longer possible.
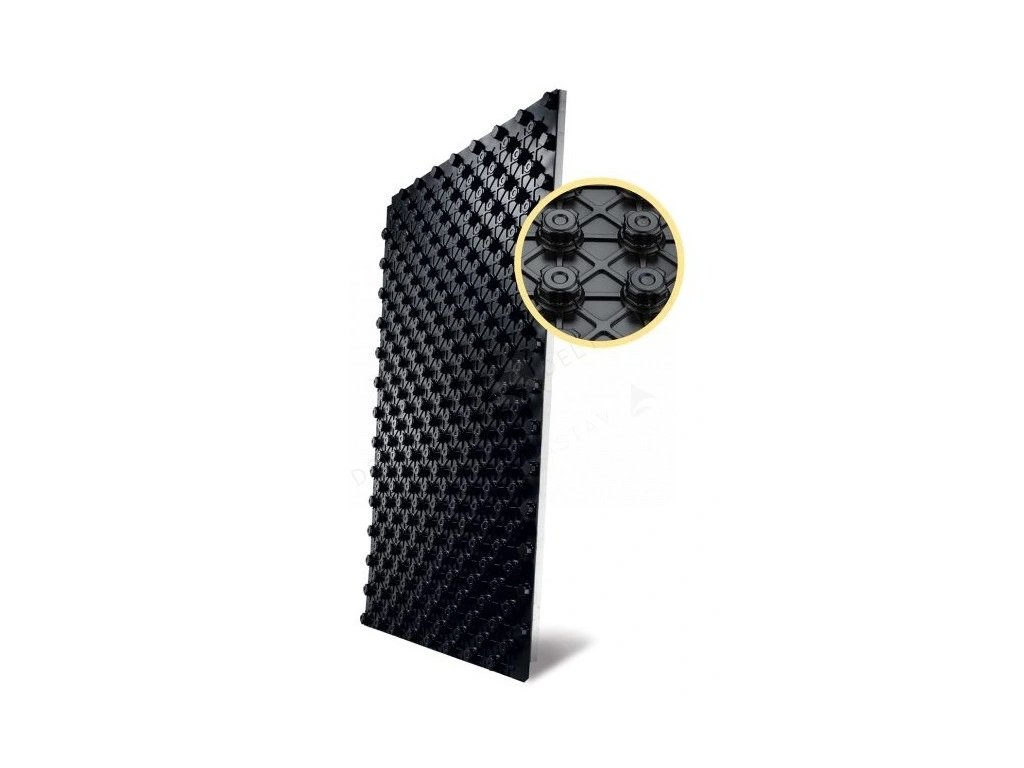
STIROTERMAL DUO 20 system insulation board
Price: €12.26
A studded system polystyrene insulation board for direct pipe fixing – a typical example of an insulation layer for wet underfloor heating systems, preventing heat loss into a neighbour's ceiling or into the ground.
A more detailed guide to choosing and laying insulation, including board types and recommended thicknesses by floor type, can be found in the article Insulation under underfloor heating – polystyrene and system boards.
The manifold – the heart of the whole underfloor heating system
The manifold is the central element that distributes water from the boiler to the individual circuits, i.e. loops, of the underfloor heating, and then brings it back from them into the return pipe toward the boiler. Each room or larger zone usually has its own loop, connected separately to the manifold – this makes it possible to regulate the temperature and flow in each room independently of the others.
The flow rate for each individual circuit is set on the manifold according to the length of the given loop and the floor area of the room that circuit heats. A room with a longer loop or a larger area needs a different flow than a small bathroom with a short circuit – this regulation is exactly why the manifold is not just a "splitter", but a genuine control element of the whole system. Actuators, controlled by the room thermostats of the individual zones, are also fitted to the manifold – when a room's thermostat determines that the required temperature has been reached, the actuator closes the supply to that circuit, and opens it again when the room needs more heat.
Price comparison of stainless steel and brass 6-way manifolds.
Manifolds are made either of brass or of stainless steel – both materials are commonly used, and the choice between them is mostly a matter of preference, availability or price, since the two designs are functionally equivalent. They are housed in a manifold cabinet, which can be either flush-mounted (recessed into the wall) or surface-mounted (fitted to the wall surface) – the choice depends on the available space and on the construction stage at which the manifold is installed.

Stainless steel 6-way manifold for underfloor heating
Price: €115.72
A stainless steel version of the manifold for 6 separate circuits – suitable for a flat or smaller family house, where water needs to be distributed to six independently regulated rooms or zones.

Brass 6-way manifold for underfloor heating
Price: €111.56
A brass version with the same number of circuits as the stainless steel version above – an alternative for those who prefer traditional brass fittings.
How to set an underfloor heating manifold step by step
Setting the manifold takes place in five consecutive steps.
Setting the manifold itself is a process that requires patience and an understanding of how the individual circuits relate to each other – changing the flow on one circuit slightly affects the pressure conditions in the other circuits connected to the same manifold as well. The basic procedure is as follows:
1. Identifying the circuits. Each circuit on the manifold should be clearly labelled – ideally directly by the room it heats. Without this labelling, any further adjustment is just guesswork.
2. Setting the flow according to loop length and room area. A longer loop creates greater hydraulic resistance, so with the same flow-meter setting less water flows through it than through a shorter loop. The aim of the setting is to even out these differences so that each circuit receives exactly as much water as it needs given its length and the area of the room it covers.
3. Hydraulic balancing of the system. After the initial setting, the system is left running for a few days and the flows are then finely adjusted based on how the individual rooms actually behave – some may need a slight increase, others a slight reduction.
4. Connection to actuators and room thermostats. Actuators fitted to the manifold respond to signals from the room thermostats of the individual zones and automatically open or close the supply to a particular circuit according to the current needs of that room. This connection is what makes underfloor heating a modern, zone-controlled system, rather than just a set of fixed-flow circuits.
5. Regular checking and bleeding. The manifold is also the point where the system is bled and its pressure checked – air trapped in the circuits reduces heat transfer efficiency and can cause cold spots on the floor even with a correctly set flow.
Precisely because the manifold setting affects comfort in every single room of the house, it is worth devoting enough time to it when commissioning the system – and in case of any doubts, do not hesitate to contact a heating specialist.
Pipe-laying patterns – serpentine vs. spiral
The way the pipe is laid within individual circuits directly affects how evenly a given room is heated – and indirectly, therefore, also how precisely the corresponding circuit needs to be set on the manifold.
The serpentine (meander) is the simplest laying pattern – the pipe runs in parallel rows across the whole room. It is faster to install, but creates a slight temperature gradient: the floor is warmer near the water supply point and gradually cooler toward the end of the loop, where the water returns already partly cooled.
The spiral (double meander) runs the supply and return pipe alternately next to each other, so that the temperature differences between the warmer and cooler water in the pipe are averaged out across the whole area. The result is a more evenly warm floor surface without pronounced temperature differences. This laying pattern is used especially along perimeter walls and in rooms with higher heat losses, where even heat distribution is particularly important.

HEPWORTH pipe for underfloor heating, 16 mm
Price: €1.48/m
A PE-RT pipe with an oxygen barrier, 16 mm diameter, specifically intended for underfloor heating – regardless of whether the serpentine or spiral laying pattern is used in a given room.
The choice between serpentine and spiral is made already at the design stage, since it is directly related to the total pipe length in the circuit and hence to the flow setting on the manifold. A detailed guide on which laying pattern to choose for a particular room type can be found in the article Pipe-laying patterns – serpentine vs. spiral.
Which floor covering is suitable for underfloor heating
The manifold and a correctly set flow rate ensure that the right amount of heat reaches the room, but how this heat shows up on the floor surface also depends on the chosen covering. The most suitable covering for underfloor heating is tile and stone – these materials have high thermal conductivity, so heat passes quickly into the room without unnecessary losses.
Laminate and wooden floors are also possible, but they must be specially certified for use with underfloor heating – that is, they must have a declared lower thermal resistance and a set maximum surface temperature. The manufacturer usually limits the maximum floor surface temperature, typically to 27–29 °C, so the wood does not dry out excessively or warp. This limit also directly affects the manifold setting and the heating-water temperature – with wooden floors, the water temperature cannot be raised as high as under tiles.
Carpet coverings significantly impair heat transfer into the room and are therefore generally not recommended for underfloor heating, or only in a low-thermal-resistance variant. If you do plan to use carpet, it is a good idea to know this already at the system design stage, since it will require a higher heating-water temperature and therefore a different flow setting on the manifold than with bare tiles. A more detailed comparison of individual coverings can be found in the article Which floor covering is suitable for underfloor heating.
Underfloor heating as a main or supplementary heat source
Even before the manifold is set at all, it is necessary to know what role underfloor heating is meant to play in a given room – whether it is the sole heat source, or merely a supplement to a classic radiator.
Underfloor heating designed as the main heat source must cover the room's entire heat loss. This requires a thorough calculation of output and pipe density already at the design stage, since the density of the pipework in the floor cannot be additionally changed once it is installed. If a circuit is designed with insufficient pipe density, no manifold setting can fully compensate for that shortfall.
As a supplementary source, for example only in a bathroom alongside a radiator, underfloor heating mainly provides the comfort of a warm floor underfoot, while the room's main heat loss is covered by another source – usually a radiator. Combining underfloor heating with radiators in a single heating system is common and functional, but requires correct hydraulic balancing, since underfloor heating operates at a lower heating-water temperature than radiators. This balancing is again handled directly at the level of the manifold and its setting. More on when to choose underfloor heating as the main and when only as a supplementary heat source can be found in the article Underfloor heating as a main or supplementary heat source.
Real-world examples
Example 1: A family house with underfloor heating as the main heat source in all rooms. In a new-build family house with five living rooms and a bathroom, underfloor heating was designed as the sole heat source for the whole house, with the hydronic system installed wet, in a concrete screed. On commissioning, it turned out that the living room, with the longest loop and the largest area, remained noticeably cooler than the smaller rooms connected to the same six-circuit manifold, even though the boiler was supplying enough heat. After the initial run-in period, the flow on the living-room circuit had to be increased, and conversely slightly reduced in the smaller rooms, where the floor was heating up faster than necessary. After this fine-tuning, which took several days of observation and adjustment, the temperature in all rooms evened out and the system began working as designed – evenly across the whole house.
Example 2: A flat in a panel building with underfloor heating only in the bathroom as a supplement to radiators. In a flat where the original radiators remain in the living rooms, underfloor heating installed as a dry system was added during a bathroom renovation because of limited floor build-up height. Since it was a supplementary, not a main, heat source, the room's main heat loss continued to be covered by the existing radiator. A problem occurred on first start-up, when the bathroom circuit seemed insufficiently warm compared to expectations – after checking, it turned out the cause was incorrect hydraulic balancing between the underfloor-heating circuit, which needs a lower water temperature, and the rest of the radiator system operating at a higher temperature. After adjusting the manifold setting and adding water-temperature mixing specifically for the underfloor-heating circuit, the expected comfort of a warm floor underfoot was achieved without negatively affecting the performance of the radiators in the rest of the flat.
Frequently asked questions about underfloor heating manifolds
Summary of key facts about manifolds mentioned in the article.
How many circuits can one manifold have?The number of circuits depends on the specific manifold design – commonly available, for example, are 6-way manifolds, which cover a flat or a smaller family house with several independently regulated rooms. In larger houses with more zones, several manifolds housed in separate cabinets can also be used.
Is a brass or a stainless steel manifold better?
Both materials are commonly used and functionally equivalent. Choosing between the brass and stainless steel version is mainly a matter of preference, availability and price, not a fundamental difference in functionality or service life under normal operation.
Why does a particular room stay cooler than the others even after adjustment?
The most common cause is an incorrectly set flow rate relative to the loop length and area of that room – a longer loop creates greater hydraulic resistance and therefore needs a different flow-meter setting on the manifold than a shorter loop. Another possible cause is air trapped in the circuit, which is resolved by bleeding directly at the manifold.
Can pipe density in the floor be changed afterwards if a room stays cold?
No, the density of the pipework in the floor cannot be changed once it is installed and the screed is poured. If underfloor heating was designed as the main heat source with insufficient pipe density, the situation can only be partly improved by adjusting the heating-water temperature and the flow setting on the manifold, not fully replaced by the correct original design.
Does every room need to have its own circuit on the manifold?
Generally yes – each room or larger zone has its own loop connected separately to the manifold, so its temperature and flow can be regulated independently of other rooms using that zone's actuator and room thermostat.
How often does the manifold need to be checked or bled?
The manifold is the point where the system is regularly checked and bled, since air trapped in the circuits reduces heat transfer efficiency and can cause cold spots on the floor even with a correctly set flow. Regular visual inspection and bleeding are recommended at any sign of uneven heating.
Can underfloor heating be combined with radiators on one manifold, or in one system?
Yes, combining underfloor heating with radiators in a single heating system is common and functional. However, it requires correct hydraulic balancing, since underfloor heating operates at a lower heating-water temperature than radiators – this balancing is handled precisely at the level of the manifold setting and any water-temperature mixing for the underfloor-heating circuit.
Does the type of floor covering affect the manifold setting?
Yes, indirectly. Coverings such as tile and stone have high thermal conductivity and allow the system to work with a lower water temperature, while certified wooden or laminate floors have a limited maximum surface temperature, typically up to 27–29 °C – this is also reflected in how the water temperature and flow are set on the corresponding manifold circuit.
Is there a difference in manifold setting between a wet and a dry system?
The flow setting itself does not differ directly between system types, but the response time does – a wet system, thanks to its greater thermal inertia, responds more slowly to setting changes but retains heat longer, while a dry system responds faster but with less inertia. When fine-tuning the flow, a longer time for the change to show should therefore be expected with a wet system.
Related topics
- How underfloor heating works
- Wet vs. dry underfloor heating system
- Which floor covering is suitable for underfloor heating
- Insulation under underfloor heating – polystyrene and system boards
- Pipe-laying patterns – serpentine vs. spiral
- Underfloor heating as a main or supplementary heat source
- Underfloor heating installation – step-by-step procedure
- Servicing, bleeding and common faults in underfloor heating
- Frequently asked questions about underfloor heating
Have a question about underfloor heating?
Can't decide, or dealing with a specific situation in your home? Write to us – we're happy to help.