
Underfloor Heating Installation – Step-by-Step Procedure
Installing underfloor heating is not a one-off job you can do "by eye" - it is a sequence of steps where each one builds on the previous one. Badly laid insulation can only be fixed by breaking up the screed, and a poorly designed manifold means cold corners in the room that are difficult to fix afterwards. This is exactly why it is worth knowing the whole procedure in advance - even before you order materials or arrange an installation company.
Six main steps of installing underfloor heating, from preparing the base to pouring the screed.
In this article we go through the installation of underfloor heating step by step - from preparing the base, through insulation, laying the pipe, connecting it to the manifold, all the way to the pressure test, pouring the screed, and finally commissioning the system. We also explain the difference between a wet and a dry system, which pipe-laying pattern (serpentine or spiral) to choose in which room, and which floor covering to pick so that the heating works to its full potential. If you want to know how underfloor heating actually works before getting into the installation itself, we recommend first reading that introductory article - here we build directly on the practical implementation.
The procedure applies equally to a new build and to a renovation, although a renovation usually adds one extra decision - wet or dry system. We cover this choice right in one of the first sections, since most of the subsequent installation steps depend on it.
Preparation before installation - design and base
Before the first metre of pipe appears on site, there should already be an underfloor heating design - that is, a calculation of the heat losses of individual rooms, the layout of circuits (loops) and their lengths, the sizing of the manifold, and the design of the heating-water temperature curve. This is a step worth not rushing - the density of the pipework in the floor cannot be changed afterwards once the screed is poured. If underfloor heating is designed as the main heat source in a room, this calculation must be especially precise, since the room's entire heat loss is meant to be covered by the floor area itself.
The base onto which the insulation and pipe will be laid must be level, clean, free of dust and debris, and, in the case of a new build, sufficiently cured (the foundation slab or ceiling). Unevenness in the base also shows up in the thickness of the screed above the pipe - in low spots the screed will be thicker, which slows down the system's response time and increases material consumption. In renovations, doors and thresholds also need to be resolved in advance - a change in floor height of a few centimetres (especially with a wet system) must also be reflected in the height of the door frames.
Part of the preparation is also deciding where to place the manifold cabinet - most often in a hallway, utility room or walk-in closet, in a central location relative to the individual circuits, so loop lengths do not grow unnecessarily. The further a room is from the manifold, the longer the pipe needed and the greater the pressure resistance of the circuit, which must be taken into account for hydraulic balancing.
Insulation under the pipe - the foundation of a functional system
A thermal insulation layer is always installed under underfloor heating pipes. Its task is to direct heat upward into the room and prevent it from escaping downward - into a neighbour's ceiling below the flat, or into the ground at ground-level floors. Without this layer, a significant part of the heat produced would escape where you do not need it, and the system would have to operate at a higher output to achieve the same comfort in the room. We covered this topic in more detail in the article Insulation under underfloor heating - polystyrene and system boards.
In practice, two solutions are most commonly used. The first is a system polystyrene board with studs, into which the pipe is clipped directly - installation is fast, the pipe stays exactly in place according to the chosen spacing, and there is no risk of it shifting when walked on during further work. The second solution is plain polystyrene, onto which the pipe is fastened with metal clips or mounting rails - this solution is cheaper, but places higher demands on precision, since the installer has to mark out and keep to the spacing themselves.
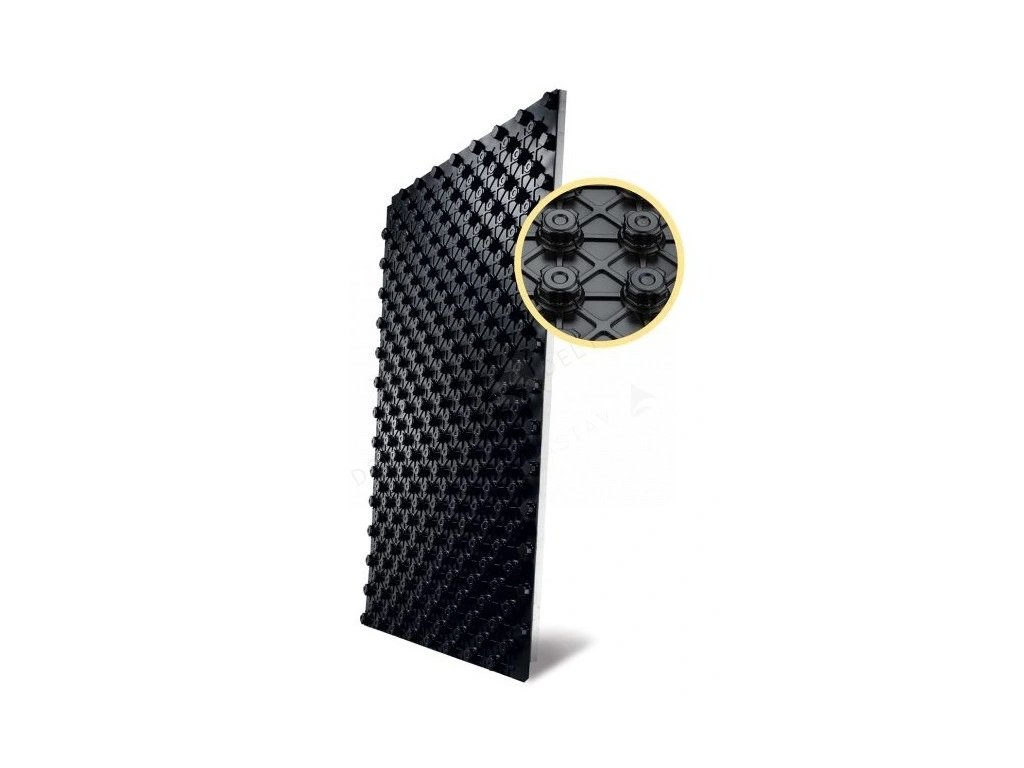
STIROTERMAL DUO 20 system insulation board
A studded system polystyrene insulation board for fixing pipes, intended directly for wet underfloor heating systems.
Price: €12.26
A simple rule applies: thicker and better-quality insulation means lower downward heat loss and a faster system response to a change in demand - that is, both faster warm-up and faster cooling of the floor. In rooms above an unheated space (cellar, garage) or a ground-level floor, it is therefore worth choosing thicker insulation than in a flat between two heated storeys, where downward heat loss is naturally lower.
Wet or dry system - what to choose depending on the building type
A wet system achieves better heat storage, a dry system can be commissioned much faster.
Even before the pipe starts being laid, you need to decide how it will be embedded or installed. The wet system lays the pipe in a layer of concrete screed - the pipe is literally embedded in concrete. This solution achieves the best heat storage and the most even heat distribution across the area, but it has two practical limitations: it requires a greater floor build-up height, typically 7 to 10 cm of screed above the insulation, and the screed needs a longer drying time before the system can be properly commissioned - expect weeks, not days.
The dry system, by contrast, lays the pipe into system boards or between mounting rails without a wet screed, with a thinner load-distribution layer - most often gypsum fibreboard. This solution is especially suitable for renovations where the floor cannot be raised by many centimetres (for example because of existing door frames or insufficient ceiling height), or where the system needs to be commissioned quickly, without a long wait for the screed to cure. A complete comparison of both approaches, including their advantages, can be found in the article Wet vs. dry underfloor heating system.
The choice between a wet and a dry system is generally made in the first phase of the project, since it also affects the insulation thickness, the type of system boards used, and how the pipe is fixed - in a wet system the pipe is clipped or fastened with clips directly onto the insulation, while in a dry system it is laid into pre-prepared grooves in the system boards.
Laying the pipe - serpentine or spiral
The serpentine is faster to install, the spiral gives more even heat especially along perimeter walls.
Once the insulation is laid (and, for a dry system, the system boards too), the actual laying of the pipe follows. Two basic laying patterns are used in practice. The serpentine (meander) is the simplest method - the pipe runs in parallel rows across the whole room. Its advantage is fast installation, its disadvantage a slight temperature gradient: at the supply into the loop the floor is warmer, and toward the end of the loop (where the water has already cooled somewhat) it is a little cooler.
The spiral, that is a double meander, runs the supply and return pipe alternately next to each other. Temperature differences are thus averaged out and the floor surface is more evenly warm across the whole area. The spiral is therefore recommended especially along perimeter walls and in rooms with higher heat losses (for example corner rooms with several external walls or large glazed areas), where the difference between the supply and return water temperature is more pronounced and even heat distribution is more important. A detailed guide with practical recommendations on which pattern to choose can be found in the article Pipe-laying patterns - serpentine vs. spiral.

HEPWORTH pipe for underfloor heating, 16 mm
A PE-RT pipe with an oxygen barrier, 16 mm diameter, specifically intended for underfloor heating - suitable for both serpentine and spiral.
Price: €1.48/m
Regardless of the pattern chosen, the pipe is always laid in one continuous piece without joints within the area - joining is only done at the manifold. The spacing between pipe rows is usually made denser near perimeter walls (shorter distance between rows) and can increase toward the centre of the room - again exactly as determined by the room's heat-loss design.
Manifold and connecting the circuits
The manifold is the central element of the whole system - it distributes water from the boiler or heat pump to the individual circuits (loops) of the underfloor heating and brings it back. Each room or thermal zone usually has its own loop, which is connected separately at the manifold. The flow rate for each circuit is set on the manifold separately - according to the loop length and the area of the room it is meant to heat - and actuators are fitted to it, opening and closing individual circuits according to signals from the room thermostats of that zone.
The brass 6-way manifold is only a few euros cheaper than the stainless steel one, functionally they are equivalent.
Manifolds are made in brass or stainless steel versions and are housed in a manifold cabinet - this can be flush-mounted (recessed into the wall) or surface-mounted (on the wall surface), depending on the available space and the construction stage at which it is being dealt with. The choice between brass and stainless steel is mostly a matter of budget and personal preference - functionally both types are equivalent, they are simply two common material variants of the manifold.

Stainless steel 6-way manifold for underfloor heating
A stainless steel manifold for 6 separate underfloor heating circuits - suitable for a flat or family house with several zones.
Price: €115.72

Brass 6-way manifold for underfloor heating
A brass manifold for 6 circuits - a more affordable alternative to the stainless steel version, with the same functionality.
Price: €111.56
When connecting circuits to the manifold, it is important to note down (and ideally label directly on the cabinet) which loop belongs to which room - this makes setting the flows, as well as any future servicing, easier. We write in more detail about how to precisely set the manifold and balance individual circuits in the article Underfloor heating manifolds - how they work and how to set them.
Pressure test, pouring the screed, and system start-up
Before pouring the screed (in a wet system) or laying the load-distribution layer (in a dry system), a pressure test of the whole system must always be carried out. The circuits are pressurised with water and left under pressure for several hours to days - if the pressure does not drop during this time, neither the pipe nor the connections at the manifold are leaking, and work can continue. This test is a critical checkpoint: once the pipe is embedded in concrete or covered by system boards, fixing a leak becomes much more complicated and costly.
After a successful pressure test, a wet system is followed by pouring the screed - the pipe should remain under pressure during pouring to prevent it from being deformed. The screed then needs time to cure - as mentioned above, this is weeks, not days, and this time cannot be shortened even with higher heating output. Only after the screed has sufficiently cured does the so-called heating-up (start-up) test follow - the system is started gradually, with the heating-water temperature slowly rising, so that the screed "gets used to" the heat evenly and without stresses that could cause cracks.
With a dry system the procedure is faster - without a wet screed there is no long wait for drying, and the system can be commissioned practically immediately after laying the load-distribution layer and the final covering. This is one of the main reasons why the dry system is chosen for renovations, where it is not possible or not desirable to wait a long time before occupying the space. If problems appear later during operation - for example uneven heating or air in the circuits - we describe how to resolve and prevent such situations in the article Servicing, bleeding and common faults in underfloor heating.
Choosing the floor covering
The last step of the installation is choosing and laying the final floor covering - and this is exactly where it is worth not deciding "by eye", since not every covering transfers heat equally well. The most suitable covering for underfloor heating is tile and stone - they have high thermal conductivity, so heat passes quickly through them into the room, and the system can therefore operate at a lower heating-water temperature for the same comfort.
Laminate and wooden floors are also compatible with underfloor heating, but must be specially certified for this purpose - they have a declared lower thermal resistance and a stated maximum surface temperature, which the manufacturer usually limits to 27-29 °C so the wood does not dry out, warp or crack. When choosing a wooden or laminate floor for underfloor heating, it is therefore always necessary to check whether the specific product has this certification - not every floor from a general range is suitable for this purpose.
Carpet coverings significantly impair heat transfer and are generally not recommended for underfloor heating - if used, they should have as low a thermal resistance as possible and a thin underlay. In most cases, however, tiles are chosen for rooms with underfloor heating (bathrooms, kitchens, hallways) or a certified wooden/laminate floor (living rooms, bedrooms). A detailed comparison of coverings, along with their suitability for individual rooms, can be found in the article Which floor covering is suitable for underfloor heating.
Underfloor heating as a main or supplementary heat source
Even before installation it should be clear what role underfloor heating will play in the given room or in the whole house - whether it is the main heat source, or just supplementary comfort. Underfloor heating designed as the main heat source must cover the room's entire heat loss, which requires a thorough calculation of output and pipe density already at the design stage - the density of the pipework in the floor cannot be changed afterwards, since it is embedded in the floor or sealed under the covering.
As a supplementary source - typically in a bathroom alongside a radiator - underfloor heating mainly provides the comfort of a warm floor underfoot, while the room's main heat loss is covered by another source, most often a radiator. Combining underfloor heating with radiators in one house is common and functionally trouble-free, but it requires correct hydraulic balancing of the whole system - underfloor heating operates at a significantly lower heating-water temperature than radiators, so this is usually handled through a mixing station or a separate circuit with its own temperature control. More on this decision and its consequences for installation can be found in the article Underfloor heating as a main or supplementary heat source.
Real-world examples
A family house with underfloor heating as the main heat source. In a new-build family house, where underfloor heating is designed as the sole heat source in all living rooms, the design already accounts for the precise layout of loops according to the heat losses of each room - corner rooms with several external walls get denser pipe spacing and a spiral laying pattern, while inner rooms with lower heat loss are fine with wider spacing and a simpler serpentine. A wet system is naturally chosen in such a case, since it is a new build without a floor-height limitation, and enough time for the screed to cure can be planned before moving in. Certified wooden flooring with a declared maximum surface temperature is then laid in the living room and bedrooms, while tiles, which transfer heat the fastest, are used in the bathrooms and kitchen.
A flat in a panel building, bathroom renovation. During a bathroom renovation in a flat, where only this one room is being changed and the rest of the flat remains heated by radiators, the main constraint is floor height - the door and threshold to the bathroom cannot be shifted by many centimetres. In such a case a dry system with a thinner load-distribution layer is generally chosen instead of a wet screed, so as not to needlessly raise the floor or complicate the connection to the door. Since this is a supplementary heat source alongside an existing radiator, there is no need to cover the room's entire heat loss through the floor - a pipe density aimed at barefoot comfort is enough, hydraulically connected to the existing radiator circuit through a separate water-temperature control. The final covering in this case is almost always tile, which transfers heat from underfloor heating best of all common coverings.
Frequently asked questions (FAQ)
How long does installing underfloor heating take?
It depends on the size of the area, the type of system, and whether it is a new build or a renovation. Laying the insulation and pipe itself usually takes a few days, but with a wet system you need to add weeks of waiting for the screed to cure before full commissioning - with a dry system this waiting time is eliminated.
Can underfloor heating be installed into an existing floor during a renovation?
Yes, this is exactly what the dry system is for - with a thinner load-distribution layer instead of a thick concrete screed, allowing installation without significantly raising the floor and without a long wait for it to dry.
What is the difference between laying in a serpentine and in a spiral?
The serpentine (meander) runs the pipe in parallel rows, is faster to install, but has a slight temperature gradient between the start and end of the loop. The spiral alternates the supply and return pipe next to each other, so the floor surface is more evenly warm - it is used mainly along perimeter walls.
Must there always be insulation under the pipe?
Yes. Insulation directs heat upward into the room and prevents it from escaping downward, into a neighbour's ceiling or into the ground. Without it the system operates inefficiently and part of the heat produced is simply lost where you do not need it.
Why is a pressure test needed before pouring the screed?
Because once concrete is poured (or system boards are laid over it in a dry system), any leak in the pipe is much harder and more costly to fix. The pressure test verifies that the whole system and the connections at the manifold are tight while the pipe is still freely accessible.
Which floor covering is best for underfloor heating?
Tile and stone, thanks to their high thermal conductivity. Wooden and laminate floors are also possible, but must be specially certified for underfloor heating with a declared maximum surface temperature (usually 27 to 29 °C). Carpet coverings are not recommended, as they significantly impair heat transfer.
Can underfloor heating be combined with radiators?
Yes, this combination is common - for example underfloor heating in a bathroom as supplementary comfort and radiators in the other rooms. It does, however, require correct hydraulic balancing, since underfloor heating operates at a lower water temperature than radiators.
What is set directly on the manifold?
The flow rate for each circuit is set on the manifold separately, according to the loop length and the area of the room it heats. Actuators are also fitted to it, opening and closing individual circuits according to signals from the room thermostats of that zone.
Is a brass manifold worse than a stainless steel one?
No, they are functionally equivalent - they are two common material variants. Choosing between them is mostly a matter of budget and personal preference, not a difference in functionality or service life.
Related topics
- How underfloor heating works
- Wet vs. dry underfloor heating system
- Which floor covering is suitable for underfloor heating
- Insulation under underfloor heating - polystyrene and system boards
- Underfloor heating manifolds - how they work and how to set them
- Pipe-laying patterns - serpentine vs. spiral
- Underfloor heating as a main or supplementary heat source
- Servicing, bleeding and common faults in underfloor heating
- Frequently asked questions about underfloor heating
Have a question about underfloor heating?
Can't decide, or dealing with a specific situation in your home? Write to us – we're happy to help.