
Side vs. Bottom Radiator Connection
Side vs. bottom radiator connection
When replacing an old cast-iron radiator with a new panel one, or doing a complete heating renovation, sooner or later every homeowner runs into a question that looks like a purely technical detail at first glance, but actually affects the heating system's output, the room's look, and the installation cost. It's the type of connection between the radiator and the pipework - side or bottom. In practice, we often see a customer buy a radiator based on its dimensions and colour, only for the connection question to be settled on-site by an electrician or installation company, once they discover the old pipework runs differently than expected. The result is usually compromises, extra costs for adjusting the pipework, or worse - a radiator that doesn't reach its stated output.
In this article we'll break down the difference between side and bottom connection from the point of view of both the ordinary user and the installer: how both solutions work, what real effect they have on a radiator's output, when it's worth choosing one or the other, which fitting to pick, and what to watch out for during installation. We're drawing on common practice for installing heating bodies both in new builds and when renovating older flats and houses in Slovakia, where both two-pipe and one-pipe systems with various pipe routing predominate.
What side and bottom connection actually mean
Before we get into comparing them, it's important to clarify the terminology, because a common mistake is mixing up two terms that actually describe different things - the connection type (where the connections are physically located on the radiator) and the wiring type (how the connections are oriented relative to each other).
Side connection (sometimes also "classic" or "lateral") means the inlet and return both come out on the same side of the radiator - one connection at the top, the other at the bottom, both on one side of the body. This is historically the oldest and most widespread connection method, one almost everyone recognises from flats built in the last century. Water flows in at the top, passes through the radiator and flows out at the bottom (or vice versa, depending on the wiring), with both pipe outlets - inlet and return - visible next to each other on the side of the body.
Diagonal connection is a variant of side connection where the inlet is at the top on one side and the return is at the bottom on the opposite side (diagonally). This wiring is considered the most hydraulically favourable, because the water has to pass through the whole width of the body and spreads evenly through it, which reduces the risk of cold spots at the bottom or the opposite end of the radiator.
Bottom connection (also "centre" or, in technical terms, "connection from below") has both connections - inlet and return - located at the bottom of the radiator, typically in the centre or closer to one edge, depending on the manufacturer and radiator range. This type has become very popular in recent years, especially with underfloor pipework, since the pipes don't need to come out of the wall at radiator height, but instead run in or just below the floor and connect to the radiator from underneath. Visually it's a cleaner solution - no pipework is visible on the wall, just the radiator itself.
In practice, two main technical approaches are used for bottom connection. The first is a special angled or straight quiet-running valve (the so-called VK valve) combined with a standard radiator that has standard side outlets - water is fed to them via a hidden pipe run inside or alongside the radiator. The second approach is using a radiator with integrated bottom connection directly (the so-called centre-bottom type, which has two or four connections in the centre of the bottom edge) combined with a so-called H-set or control set, which combines both the shut-off and thermostatic valve into a single compact unit.
How it works in terms of water flow
To understand why the connection type affects output, you need to picture what happens to the water inside the radiator. A panel radiator consists of one, two or three flat panels with internal channels, through which water flows top to bottom or across. Heat transfers into the room better the more evenly the hot water spreads across the whole surface of the body. If the water is forced to travel a long distance, or has to "split" across several paths, slight pressure losses occur and the temperature distributes unevenly - the parts of the radiator furthest from the inlet tend to be cooler.
With diagonal connection (running at an angle across the whole radiator), this path is the longest and most even - the water "has to" pass through the whole body, and heat is released evenly across the whole surface. With side connection on the same side (top and bottom connection both on one side), this path is somewhat shorter, since the water tends to "short-cut" closer to the connections, and the far side of the radiator warms up somewhat more slowly. With bottom connection, the situation is specific - both connections are at the bottom, so the water first has to "rise" up through the internal channels and then come back down to the return. On shorter, lower radiators this makes practically no difference; on very long radiators (over 1600-1800 mm wide), a slightly slower warm-up of the parts furthest from the centre can start to show.
This is exactly why radiator manufacturers (such as Korado, Kermi, Purmo) state a so-called output correction factor in their technical data sheets for various wiring types - a number the radiator's declared (catalogue) output must be adjusted by if the reference diagonal wiring isn't used. These corrections aren't some theoretical figure manufacturers invented just to be safe - they're real values measured in test chambers, and they translate directly into how much heat the radiator actually delivers in a given room.
Real output differences - the numbers to keep in mind
To avoid abstract claims, here are specific approximate values commonly found in the catalogues and technical documentation of panel radiator manufacturers, and confirmed in practice by measuring surface temperatures on the body:
- Diagonal connection - taken as the reference value, i.e. 100% of the radiator's catalogue output.
- Side connection on radiators up to roughly 1000 mm long - an output drop of about 3 to 4%, practically unnoticeable in a home.
- Side connection on radiators over 1600 mm long - the output drop can grow to 10 to 15%, since the far side of the body warms up significantly more slowly.
- Bottom connection on radiators up to 1200 mm - an output drop of about 2 to 4%, practically comparable to short side connection.
- Bottom connection on radiators in the 1800 to 2400 mm length range - the output drop runs around 8 to 12%, which already needs factoring into the output design.
These percentages aren't absolute for every single model - they depend on the radiator's construction (number of panels, height, presence of convector fins), but as a rough estimate they hold across commonly sold panel radiators of types 21K, 22K or 33K. The practical takeaway is simple: for short and medium-length radiators (up to roughly 1200-1400 mm), which make up the vast majority of installations in bathroom cores and smaller rooms, the difference between side and bottom connection in terms of output is negligible, and aesthetics and pipework availability decide instead. For very long radiators (typically in living rooms under large windows), it's worth factoring output into the choice of connection type too, or choosing a slightly more powerful model that compensates for the loss.
Recommended products for both connection types
For classic side connection, dual-regulation angled valves are the most common, allowing fine flow adjustment right at the radiator while also serving as a shut-off element when taking the body out of service (for example when bleeding or replacing it):
 |
Thermostatic dual-regulation valve - 1/2"xEK; angled - the classic choice for side-connecting a radiator to a riser or to pipework run in a wall or floor with an outlet into the corner. The dual-regulation type also allows pre-setting the flow balance, which is valuable especially in systems with several radiators on one circuit. Price from €14.27. |
For bottom connection, the typical solution is a compact control (H) set, which combines both the shut-off and thermostatic valve and connects directly to the radiator's bottom connections, either vertically from the floor or horizontally from under the plaster:
 |
HPW Set1 control set - a complete set for bottom-connecting a radiator, including union fittings, suitable for both underfloor and in-wall pipework. A tidy, clean solution with no visible pipework on the wall - ideal for renovations where you want to hide the pipes in the floor. Price from €27.94. |
The connection type itself, though, is only half the equation - the other half is choosing the right radiator with enough output for the room. As shown above, longer radiators need a slight output correction, so it's worth reaching for a model with a slightly higher catalogue output than the room's calculated heat loss:
 |
Radiator 21K 300 x 400, output 298W - a compact, low radiator where the difference between side and bottom connection in terms of output is practically negligible (up to 1000 mm length falls into the category with only a 3-4% drop). Suitable for smaller bathrooms and utility rooms. Price from €58.79. |
 |
Radiator 21K 300 x 500, output 373W - a slightly more powerful model suitable where you need higher output while keeping a low build height, for example under the sill of a larger window. Here too, choosing bottom connection at a length up to 1200 mm means only a minimal output drop. Price from €65.56. |
When to choose side and when to choose bottom connection
In practice, several factors decide the choice of connection type, and they need to be weighed together, not judged in isolation on just one criterion.
New build or a complete floor renovation
If you're building new, or planning a major renovation involving replacing the floors (for example switching to underfloor heating combined with radiators, or just a complete pipework replacement), bottom connection is almost always the better choice. The pipework runs in the floor or the screed, no pipework is visible on the wall, and the radiator looks clean and tidy. The downside is that pipework once cast into the floor is harder to repair, so it's worth investing in quality pipes and fittings and thoroughly pressure-testing the system before the screed is poured - you should never skip the pressure test, even if it feels like an unnecessary extra step.
Renovating a flat while keeping the existing pipework
If you're only replacing the radiator while the risers or in-wall pipework stay as they are, it's generally simpler and cheaper to keep the side connection, since it exactly matches the existing pipework's position. Rerouting pipework from the wall into the floor just for the aesthetics of a bottom connection is a major building intervention (demolition, a new floor, a pressure test, a longer project timeline) and may not be worth it if the side pipework doesn't genuinely bother you, or you can hide it behind trunking or furniture.
Long radiators under large windows
For very long radiators, as shown in the numbers above, the output difference between side connection and diagonal/bottom connection starts to become noticeable. If you're planning a radiator longer than 1600-1800 mm, we recommend either considering diagonal wiring (if the pipework allows it), or planning for a slightly higher-output model to compensate for the loss caused by the connection type.
Bathrooms and smaller rooms
In bathrooms, where towel-rail (bathroom) radiators are often used, bottom connection has become practically the standard - this is also because these spaces tend to be smaller and aesthetics play a bigger role than in a utility room. At the same time, bathroom radiators are generally taller and narrower, so the effect of connection type on output is negligible for them.
Step-by-step installation - what to watch out for
Regardless of whether you choose side or bottom connection, the actual procedure for replacing or installing a radiator follows the same basic logic. The differences lie mainly in which fittings are used and their orientation.
The first step is always to drain, or at least isolate, the circuit you'll be working on - with more modern systems that have shut-off valves on the riser, closing off the inlet and return to that radiator is enough; with older pipework with no shut-off elements, it's sometimes necessary to drain the whole system, or at least a large part of it. It's worth finding out in advance whether the house or flat has working shut-off valves at every radiator - if not, adding them while replacing the radiator is clearly worth it, and will significantly simplify any future service work.
The second step is removing the old radiator and existing fittings. This is a good moment to check the condition of the pipework itself - the threads, seals, and any corrosion on old steel pipework. If you're planning to change the connection type (for example from side to bottom), this is the only point at which the pipe route can be changed without major complications.
The third step is fitting the new fittings - for side connection this is typically an angled or straight thermostatic valve on one side and a shut-off (union) fitting on the other; for bottom connection, a compact H-set or a pair of VK valves is fitted directly into the radiator's bottom connections. Here it's important to seal the threaded joints properly (PTFE tape or hemp fibre with sealant, depending on the installer's practice) and to make sure the fitting stays accessible for future servicing and bleeding.
The fourth step is hanging and connecting the radiator itself to the prepared fittings, checking it's level (with a spirit level, not by eye) and tightening all joints to the specified torque - overtightening can damage the seal just as much as undertightening.
The fifth step is filling the system and thoroughly bleeding the radiator via the bleed valve, usually found in the top corner of the body. Air in the system is one of the most common reasons a radiator "doesn't heat like it used to" after a replacement - it has nothing to do with the connection type, but with an air bubble blocking water flow in the upper part of the body.
The sixth, often underrated step is checking the tightness of all joints after a few hours and again after a few days of operation - thermal expansion of the material can make a small, initially unnoticeable leak show up only after some time has passed.
Additional accessories that are often forgotten
Regardless of connection type, a thermostatic head is part of almost every modern installation, letting you control the room temperature automatically based on a set value, without having to manually fine-tune the valve every time the weather changes:
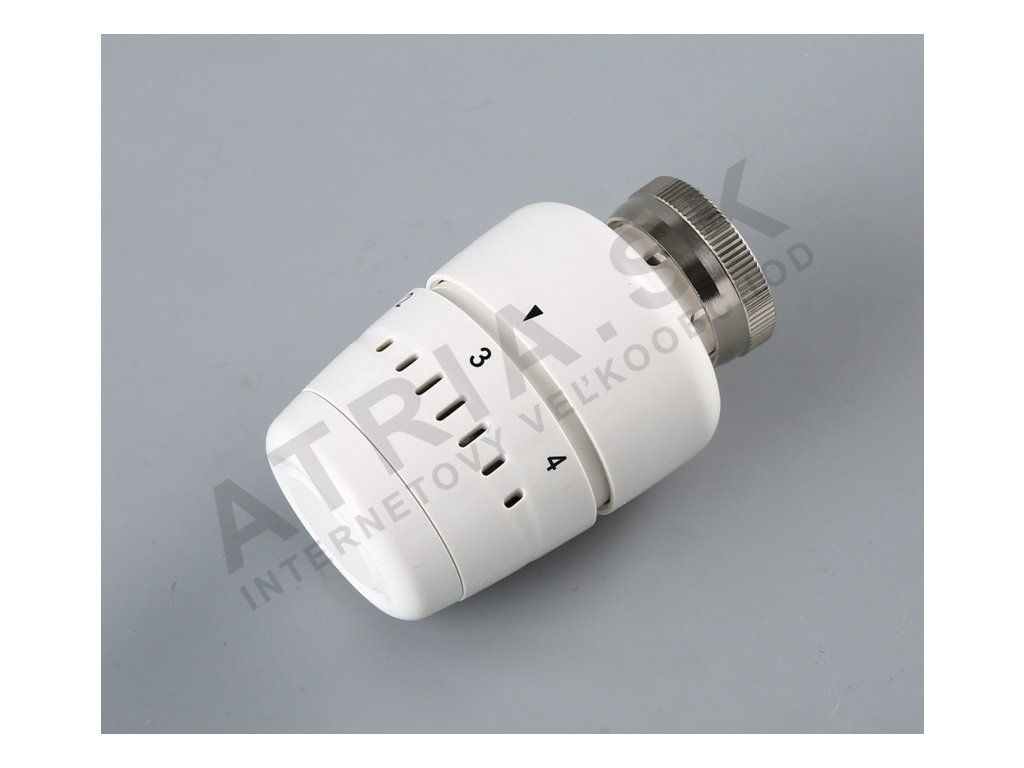 |
Large thermostatic head - lacquered - compatible with both classic thermostatic valves on side connection and an H-set on bottom connection. Its attractive lacquered finish complements modern radiators well and allows precise fine-tuning of the room temperature without touching the central heating system. Price from €8.49. |
With bottom connection, it's also worth thinking about the head's orientation - since the fitting sits low near the floor, a standard horizontal head can be harder to reach or may end up hidden behind furniture. In that case, remote heads with a capillary tube exist, which sense the temperature at a different point while the dial itself sits higher up and is more accessible - though this is a more specific solution, worth discussing directly when choosing the specific radiator and its placement.
The most common mistakes we see in practice
The first and most common mistake is underestimating radiator length when choosing bottom connection without correcting the output - a customer picks a radiator based only on the room's heat loss calculated for diagonal wiring, but it's connected on-site with bottom connection, which effectively "loses" 8 to 12% of output without them realising it. The result is a room that doesn't reach the desired temperature on freezing days.
The second mistake is swapping the position of the inlet and return in side diagonal wiring - if the inlet and return are mistakenly connected on the same side instead of diagonally, the radiator still works, but with significantly lower output than designed, since it's effectively turned into an ordinary side connection.
The third, very common mistake is insufficient bleeding after replacement, which shows up most often precisely with bottom connection - since the water has to "rise" up and come back down, an air bubble in the upper part of the body can block practically the whole upper half of the radiator, creating the impression of "cold at the top, warm at the bottom", which many people mistakenly put down to the connection type itself, when it's really just air in the system.
The fourth mistake is using the wrong diameter or type of pipe when converting pipework from the wall to the floor - especially with bottom connection via underfloor pipework, you need to stick to the pipe manufacturer's recommendations (for example multi-layer pipes with an aluminium liner) and not use smaller diameters than the design calls for, just to make the pipe "fit" into a thinner layer of screed.
Frequently Asked Questions
Can a side connection be converted to bottom connection later without demolition?
In most cases, no, not without working on the pipework - unless the pipework already runs in the floor, converting to bottom connection will require at least partially opening up the floor or wall around the radiator. If the main thing you care about is aesthetics with no visible pipework, there's also a compromise solution - side connection with hidden pipework run in decorative trunking or directly in a chase in the wall, which looks visually similar to bottom connection but doesn't require touching the floor.
Is it true that bottom connection always has lower output than side connection?
No, that's not a universal rule. For short and medium-length radiators (up to roughly 1200 mm), the difference between the two types is minimal, on the order of 1 to 2 percentage points. The difference only starts to show up more noticeably with longer radiators, where bottom connection can even be somewhat more favourable than a classic one-sided side connection, precisely because the water splits more symmetrically to both sides from the centre of the body.
Do I need a special radiator for bottom connection, or is a standard model enough?
It depends on the approach. If you want to use a radiator with genuinely integrated bottom connections (the so-called "centre-bottom" type), you need to choose a model that offers this variant directly from the manufacturer. If all you care about is not having visible pipework on the wall, a standard radiator with standard side connections can also be used, combined with a VK valve and a hidden feed pipe run in the floor or wall right up to the side of the radiator.
When renovating, is it worth choosing diagonal wiring instead of bottom connection?
If the pipework and building layout allow it without unnecessary complications, diagonal wiring is the most favourable purely in output terms. In practice, though, bottom connection dominates in renovations with underfloor pipework, because it's easier to implement and looks better, and the output difference can easily be compensated for by choosing a slightly more powerful radiator model.
How do I tell whether my old radiator has side or bottom connection?
Just look at where the connections come out of the radiator (the metal threaded "necks" the valves are screwed onto). If both are at the top/bottom on the same side of the body, it's side connection. If both are at the bottom, usually in the centre or closer to one edge of the bottom edge, it's bottom connection. With the diagonal type, you'll find one connection at the top on one side and the other at the bottom on the opposite side.
Does the connection type affect how noisy a radiator is?
The connection type itself doesn't directly affect noise - that's more related to water flow velocity, air present in the system, or an incorrectly set flow on the thermostatic valve. Indirectly, though, bottom connection with a compact H-set has fewer joints and fewer places where flow noise can occur, compared to older angled valves with leaking packing.
Related topics
If this topic interested you, we also recommend these related articles from our radiator knowledge centre:
- How to choose a radiator - type and size
- What radiator output do I need
- Radiator installation and replacement
- Thermostatic heads and smart control
- Radiator not heating or heating unevenly
- Bleeding a radiator - when and how
You'll find the full range of radiators, thermostatic valves and accessories in the main Radiators category.
Have a question on this topic?
Not sure which connection type to choose for your radiator, or dealing with a specific situation in your home? Write to us - we're happy to help.