
Solar Piping and Stainless Steel Corrugated Pipes – How They Work
When it comes to solar water heating, most of the attention usually goes to the collectors on the roof and the tank in the utility room. But there has to be piping running between them – and this seemingly inconspicuous element is what determines whether the system will run reliably for decades, or become the most frequent source of faults. A solar circuit is not an ordinary water pipe. It is a closed, pressurised circuit through which hot heat-transfer fluid circulates, and the piping has to cope with temperature swings, pressure and the chemical demands of the fluid itself.
In practice, when it comes to routing between the collector and the utility room, we generally see two approaches: classic piping (copper or stainless steel), which has to be insulated additionally on site, or pre-insulated 2-in-1 flexi pipe, where the flow and return are combined within one flexible, already insulated jacket. On top of that there is a special case – stainless steel corrugated pipe, used where the pipe needs to be routed through a roof penetration, get around an obstacle, or connect collectors together without unnecessary fittings and joints.
This article explains how solar piping fits into the whole system – from the collector through the pump unit and the control unit to the solar tank – and when it pays off to reach for stainless steel corrugated pipe, when to use pre-insulated flexi pipe, and what to watch out for when filling, venting and mounting the collectors, which is also what determines the piping route itself.
What a Solar Water Heating System Is and Where the Piping Fits In
A solar system consists of four interconnected components linked together by piping.
A solar water heating system (a hot-water solar assembly) consists of four main components: solar collectors on the roof, which capture sunlight and heat the heat-transfer fluid (a mix of water and antifreeze), a solar tank with a heat exchanger, a pump unit that keeps the fluid circulating, and a control unit that switches the whole process on and off based on temperatures. The piping is the element that physically connects all these components – it carries hot fluid down from the collector to the exchanger in the tank, and the cooler return flow back up to the collector.
It's important to keep in mind that a solar system supplements, but does not fully replace, the main heat source – that is, the boiler or heat pump. It can cover the most heat for domestic hot water in the summer months, when there's plenty of sunlight and the demand for space heating is minimal or none. Outside the summer season, the system only partially heats the water, with the rest topped up by the boiler or heat pump via a second exchanger in the tank. If you're considering whether and how large a solar system to install in your home, it's worth first going through the basic selection criteria in the article How to Choose a Solar Water Heating System – there's no point planning the piping and its route before it's clear how many collectors, what kind of tank and what route the system will need.
Precisely because it's a supplementary, not the main, heat source, it's worth thinking about how the solar circuit will connect to the existing heating system. This topic is covered in more detail in the article Solar Heating as a Supplement to the Boiler, where you'll also find the relationship between the piping route and the location of the utility room relative to the boiler.
What Demands Does the Solar Circuit Place on the Piping
The solar circuit is a closed, pressurised system with its own expansion vessel, which compensates for the volumetric expansion of the heat-transfer fluid at high temperatures. This has a direct impact on what kind of piping may be used in the circuit – it's not an ordinary unpressurised distribution system, but a circuit that has to withstand pressure, temperature swings and contact with the antifreeze mix over the long term.
The heat-transfer fluid in the circuit is not plain water, but a mix of water and antifreeze, which ensures the fluid in the piping on the roof doesn't freeze even on the coldest winter nights. At the same time, on hot summer days, when the tank is already fully heated and the pump stops, the fluid in the collector and the adjacent section of piping can reach high temperatures. The piping, joints and seals therefore need to withstand this – which applies equally to classic copper or stainless steel piping, pre-insulated flexi pipe, and stainless steel corrugated pipe.
The system is filled and vented using a manual or electric filling pump via filling valves, similar to a classic heating circuit. This means the piping itself and its joints have to be routed and installed so that the whole circuit can be reliably filled and, above all, vented – air pockets in poorly routed piping prevent proper fluid circulation and can cause the collector to overheat or the pump to become noisy. You can find more on how filling and venting work in practice, and which faults come up most often, in the article Servicing, Filling and Common Faults in Solar Systems.
Classic Insulated Piping vs. Pre-Insulated 2-in-1 Flexi Pipe
The choice of piping type depends on the length and difficulty of the route between the collector and the tank.
When choosing how to route the distribution between the collector and the utility room, there are basically two options. The first is classic copper or stainless steel piping, run as two separate pipes (flow and return), which have to be insulated afterwards – that is, once they've been installed on site, both on the roof and in the shaft or duct through which they pass into the house. The second option is pre-insulated 2-in-1 flexi pipe, where the flow and return are combined into a single flexible jacket that's already insulated at the factory.
This difference has a direct impact on installation time and complexity. With classic piping, after laying the pipes the installation company still has to apply thermal insulation on site – on the roof, where work takes place at height and often under difficult conditions, as well as in the shaft or riser, where space is limited. With 2-in-1 flexi pipe, this step is eliminated entirely, because the insulation is part of the pipe from the factory. This shortens installation time, which is especially valued on longer routes or during renovations, when work takes place in an occupied house and every hour of installation saved means fewer disruptions for the household.
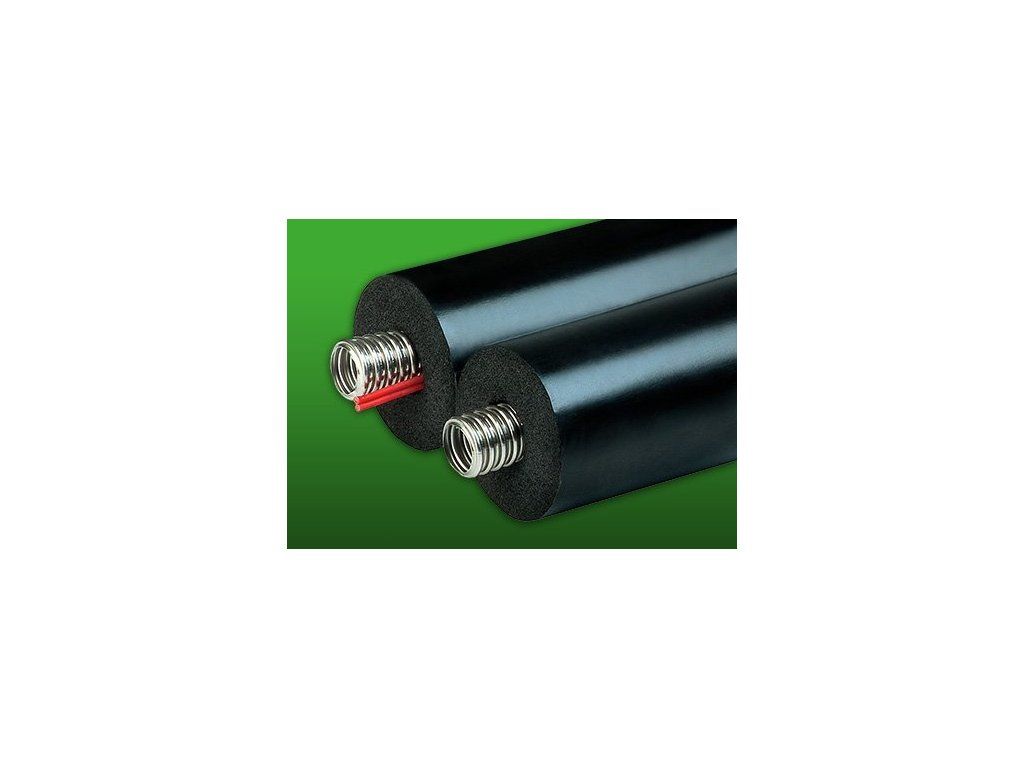
Solar Flexi Pipe 2-in-1, 10 m
Pre-insulated, flexible dual pipe – flow and return combined in a single jacket, ready for quick installation of the distribution between the collector and the utility room without the need for additional insulation.
Price: 308.75 €
The choice between the two variants is usually not a question of "better or worse", but of the specific route and budget. A straight, easily accessible route can be handled just as well with classic insulated piping, while longer or more complicated routes, where additional on-site insulation would mean a lot of work, are the domain of 2-in-1 flexi pipe. For short but mechanically demanding sections – for example right at the roof penetration or when connecting the collectors themselves – installers more often reach for stainless steel corrugated pipe, which the next section covers.
Stainless Steel Piping (Corrugated Pipe) – A Flexible Solution for Short, Tricky Sections
Stainless steel piping, or corrugated pipe, is flexible stainless steel piping designed for the run between the collector and the tank, resistant to the high temperatures of the solar fluid. Unlike pre-insulated 2-in-1 flexi pipe, it's a standalone pipe without its own thermal insulation – this has to be added afterwards, similar to classic copper or stainless steel piping. Its main advantage, however, is flexibility combined with the durability of stainless steel.
In practice, corrugated pipe is used mainly where rigid, straight piping would require multiple fittings and elbows – meaning multiple potential leak points. A typical example is connecting individual collectors to each other, where the corrugated pipe can bridge the distance between the flow and return of neighbouring collectors without needing a rigid elbow and two additional joints. Corrugated pipe is likewise suitable for the roof penetration itself, through the roofing or roof structure, where space is limited and the pipe has to conform to the shape of the penetration, or for connecting to the pump unit in the tight confines of a utility room, where rigid piping simply has nowhere to "bend".

Stainless Steel Piping, Corrugated Pipe
Flexible stainless steel piping for the run between the collector and the tank, resistant to the high temperatures of the solar fluid – suitable for connecting collectors, roof penetrations and connections in tight spaces.
Price: 3.81 €
The lower unit price of corrugated pipe compared to a full 2-in-1 flexi pipe isn't a coincidence – it's a different type of product, intended more for supplementary, shorter sections of the route than for the entire length of distribution between the roof and the utility room. In practice, the two approaches are therefore often combined: the installation company handles the main, longer route with pre-insulated flexi pipe or classic insulated piping, while short, awkwardly shaped sections near the collectors or the pump unit are finished off with stainless steel corrugated pipe.
The Solar Tank – How the Piping Connects to It
Compared to an ordinary boiler tank, a solar tank has at least one additional heat exchanger connected to the solar circuit, and often a second exchanger for topping up the heat from the boiler. The water in the tank is heated indirectly – the solar fluid circulates separately, in its own closed circuit, and never comes into direct contact with the domestic hot water that flows from the taps. The piping from the collector therefore doesn't end up "in the water" of the tank, but is connected to the inlet and outlet of the solar exchanger, which is built into the tank's construction.
This separation of circuits also has a practical consequence for the piping itself: since the heat-transfer fluid never leaves the closed solar circuit, the piping and all its joints have to remain leak-tight over the long term, precisely because any leak means not just a loss of water but a loss of the antifreeze mix, which then has to be topped up and the circuit vented again. When choosing a specific tank, its volume and number of exchangers, it's worth starting from the more detailed guide What Solar Tank Do I Need, where you'll also find the relationship between tank size and the length or diameter of the piping route.
The Pump Unit and Control Unit – What Drives Circulation in the Piping
The piping alone would be useless without a drive – the fluid doesn't move through it on its own. That's taken care of by the pump unit working together with the control unit. The control (solar) unit compares the temperature at the collector and at the tank using sensors, and when the collector is warmer than the tank by a pre-set difference, it switches on the circulation pump of the solar group. When the temperature difference narrows or the collector stops being warmer, the pump switches off again – so the system runs automatically, without the need for manual intervention.
The pump unit, however, isn't just the pump on its own. Within a single compact block it also includes shut-off valves, thermometers, pressure gauges and a safety valve, which significantly simplifies both installation and later servicing – all the key components for operating the circuit are together in one place, rather than being spread out along the whole length of the piping.

Solar Pump Unit ZP2-12 ECO
A complete pump group (circulation pump, valves, pressure gauges, safety valve) for circulating the solar fluid between the collector and the tank – connects directly to the piping route from the collector and into the tank.
Price: 750.55 €
An example of a control unit that evaluates the whole process is the Euroster 813 Solar controller – a device that compares the temperature of the collector and the tank and switches the circulation pump in the pump unit according to the set difference.

Euroster 813 Solar
A solar controller (control unit) for operating the pump based on the temperature difference between the collector and the tank.
Price: 108.94 €
The prices of the individual components mentioned in the article vary significantly according to their function in the system.
So the combination of piping, pump unit and control unit works as a single whole – the piping is the "road", the pump unit is the "engine" and the control unit is the "brain" that decides when the fluid should travel along that road. You can find a more detailed comparison of available control units and pump groups in the article Control Units and Pump Groups for Solar Systems.
Collector Mounting and the Piping Route by Roof Type
The piping route always depends on how and where the collectors are mounted on the roof or facade. Collectors are anchored using a specialised mounting structure that depends on the roof type – on a pitched roof the structure varies according to the roofing material (tiles, sheet metal, plain tiles), on a flat roof a structure with adjustable tilt is used, usually at least 15°, so the collector can self-clean with rainwater, and finally there's also the option of mounting on a facade or directly on the ground. The structure always has to match the dimensions of the specific collector type exactly.
For the piping, this means that the roof pitch, the type of structure and the exact placement of the collectors determine where the piping route will run, how many bends it will have, and where a penetration through the roof structure will be needed. On a flat roof with an adjustable collector tilt, there's usually also a flat area of roof around the structure where the piping can be routed fairly directly to the penetration. On a pitched roof, by contrast, the piping often has to follow the slope of the roof plane and run along the battens or rafters to the penetration point.

Mounting Kit for Collectors on Flat Roofs up to a 15° Pitch, for the KS 2100F 1.82 m² Collector
A mounting structure for fixing a flat-plate collector to a flat roof with adjustable tilt – it also determines where the following piping route to the penetration into the house will run.
Price: 117.34 €
View product Mounting Kit for Collectors on Flat Roofs up to a 15° Pitch
This is exactly why it doesn't pay to plan the mounting structure and the piping separately – the structure determines the collector's position, the collector's position determines the shortest and most practical piping route, and that route ultimately decides whether it's worth using classic piping, pre-insulated 2-in-1 flexi pipe, or a combination with stainless steel corrugated pipe for the trickier sections. You can find more on mounting collectors on different roof types and facades in the article Mounting Collectors – Pitched Roof, Flat Roof, Facade.
Expansion Vessel, Filling and Venting the Circuit
As already mentioned, the solar circuit is a closed, pressurised system. Part of such a circuit is its own expansion vessel, which compensates for the volumetric expansion of the heat-transfer fluid at high temperatures – without it, the pressure in the circuit could rise uncontrollably as the fluid heats up. The expansion vessel is usually located in the utility room, near the pump unit, and is connected to the piping in the same way as the rest of the circuit.
The system is filled and then vented using a manual or electric filling pump via filling valves, similar to a classic heating circuit. This step is carried out not only when the system is first commissioned, but also during servicing – for example, if air has entered the circuit for any reason, or if part of the piping or components has been replaced. Well-routed piping, without unnecessary high points where air could collect, makes this process much easier. Conversely, piping with poorly placed bends or unnecessary loops can complicate venting and cause repeated problems with a noisy pump or uneven heating.
Regularly checking the pressure in the circuit, the condition of the expansion vessel and the tightness of the piping joints is one of the basic tasks of routine solar system maintenance. You can find a detailed overview of what servicing involves and which faults come up most often in practice in the article Servicing, Filling and Common Faults in Solar Systems.
Installing the Piping – Practical Procedure and What to Watch Out For
Each step of piping installation follows on from the previous one, from the roof type all the way to venting the circuit.
Installing a solar system, including the piping, follows a logical sequence of steps. First, based on the roof type, the collector mounting structure is chosen and installed, then the piping route is determined from the collectors to the penetration into the house and on to the utility room. This is where it's decided whether to use classic piping with additional insulation, pre-insulated 2-in-1 flexi pipe, or a combination with stainless steel corrugated pipe for short, awkwardly shaped sections – for example right at the collector interconnection or the roof penetration.
After the piping is laid, it's connected to the pump unit and control unit on one side, and to the solar tank (more precisely, to its solar exchanger) on the other. The components themselves – the pump unit with its valves, pressure gauges and safety valve – are usually installed close together in one block, which also simplifies connecting the piping from both directions. Finally, the whole circuit is filled with heat-transfer fluid and vented using the filling pump via the filling valves, the control unit is set, and the system is put into trial operation.
Precisely because this is a multi-step process where each step affects the next one (roof type → collector position → piping route → choice of piping type → connection to components → filling and venting), it pays to have a clear plan before installation. You can find a detailed step-by-step procedure, including recommendations on the order of the individual steps, in the article Installing a Solar System – Step by Step.
Real Examples from Practice
A family house with a tile-covered pitched roof, renovation of an existing building. The collectors are mounted on the pitched roof, and the utility room with the tank and boiler is located in the basement, meaning a fairly long piping route – through the attic, alongside the roof frame, through the riser and down to the basement. Given this route length and the passage through multiple structural levels of the house (attic, living floor, basement), the installation company chose pre-insulated 2-in-1 flexi pipe instead of classic piping. The main reason was that adding insulation to classic piping on such a long and complex route, partly at height in the attic and partly in a cramped riser, would have significantly extended the installation time. Right at the collectors, where two rows of collectors needed to be connected to each other while working around the mounting structure, a short section of stainless steel corrugated pipe was also used – thanks to its flexibility, the connection could be made without additional fittings, which also reduced the number of joints directly on the roof, where any leak would be the hardest to reach for repair.
A family house with a flat roof, new build. The collectors are mounted on the flat roof on a mounting structure with adjustable tilt, and the utility room is located directly under the roof, in the attic, so the piping route from the collector to the pump unit is short – just one roof penetration and a connection right below it. Precisely because of the short distance and the tight space right beneath the roof structure, where the penetration itself is also located, stainless steel corrugated pipe was preferred for the whole short section in this case instead of classic rigid piping – the corrugated pipe was able to conform to the shape of the penetration and the limited space by the pump unit without needing multiple elbows. Adding insulation to this short section represented only a fraction of the work compared to what a longer route would require, so it was worth saving on the number of joints and fittings instead of using pre-insulated flexi pipe, which would have been unnecessarily oversized for such a short section.
FAQ – Frequently Asked Questions About Solar Piping
Does the piping of the solar circuit always have to be insulated?
Yes. The only difference is when and how the insulation is applied. With classic copper or stainless steel piping, including stainless steel corrugated pipe, the insulation is added afterwards, directly on site during installation. With pre-insulated 2-in-1 flexi pipe, the insulation is already part of the pipe's jacket from the factory, so nothing needs to be insulated afterwards.
What is the difference between classic piping and pre-insulated 2-in-1 flexi pipe?
Classic piping routes the flow and return as two separate pipes, which have to be insulated after installation, both on the roof and in the shaft. Flexi pipe 2-in-1 combines the flow and return into a single flexible, already insulated jacket, which eliminates additional insulation entirely and makes installation faster.
What exactly is stainless steel piping (corrugated pipe) used for?
Stainless steel corrugated pipe is flexible stainless steel piping designed for the run between the collector and the tank, resistant to the high temperatures of the solar fluid. In practice, it's used mainly for short, awkwardly shaped sections – connecting collectors to each other, roof penetrations, or connections in tight spaces by the pump unit, where rigid piping would require more fittings and joints.
Why is the solar circuit closed and pressurised, and what is the expansion vessel for?
The solar circuit is closed so that the heat-transfer fluid (a mix of water and antifreeze) doesn't come into contact with the surroundings or with the domestic hot water. The expansion vessel compensates for the volumetric expansion of this fluid at high temperatures, preventing an uncontrolled rise in pressure in the circuit.
How is the solar circuit filled and vented?
Using a manual or electric filling pump via filling valves, similar to a classic heating circuit. This step is carried out both when the system is first commissioned and during servicing, for example if air has entered the circuit.
Can a solar system fully replace a boiler or heat pump?
No, it doesn't fully replace them. The system supplements the main heat source and covers the most heat for domestic hot water in the summer months, when there's plenty of sunlight. Outside this period it usually only partially heats the water, with the rest of the heat supplied by the boiler or heat pump.
Does the roof type affect how the piping is routed?
Yes, directly. The roof type (pitched with a specific roofing material, flat with adjustable tilt, or facade/ground) determines the type of collector mounting structure, and that in turn determines the collector's position and therefore also the route the following piping takes to the penetration into the house.
Is a special pump unit needed, or is an ordinary circulation pump enough?
A pump unit is used in the solar circuit, combining a circulation pump, shut-off valves, thermometers, pressure gauges and a safety valve within a single compact block. This arrangement simplifies both installation and servicing, since all the necessary components for operating the circuit are in one place, connected directly to the piping from both sides.
Can corrugated pipe be used for the entire piping route instead of 2-in-1 flexi pipe?
Theoretically yes, but in practice corrugated pipe is more commonly used for shorter, awkwardly shaped sections, while for a longer main route, pre-insulated 2-in-1 flexi pipe pays off more, since it saves the work of additional insulation along the entire length of the run. The choice should always be based on the specific length and shape of the route in the given house.
Related Topics
- How to Choose a Solar Water Heating System
- Flat-Plate vs. Vacuum Tube Solar Collectors
- What Solar Tank Do I Need
- Control Units and Pump Groups for Solar Systems
- Mounting Collectors – Pitched Roof, Flat Roof, Facade
- Solar Heating as a Supplement to the Boiler
- Installing a Solar System – Step by Step
- Servicing, Filling and Common Faults in Solar Systems
- Frequently Asked Questions About Solar Assemblies and Collectors
Have a Question About Solar Systems or Collectors?
Can't decide, or dealing with a specific situation in your household? Write to us – we're happy to help.